Resistors and Circuits
Overview
-
Reading (Preface, Chapter 1, Chapter 2 of MGTE)
-
Create an Account (Circuits 123D) and Install Software (Fritzing)
-
Draw Your First Circuit
Submission
You will be recording this homework in your notebook (in the case of notes about your reading) or a diagram that I’ll ask you to have open for quick visual inspection at the start of class. We will be using our laptops on Tuesday, so please bring them.
Reading (MGTE)
In the Manga Guide to Electronics, please read the preface, chapter one, and chapter two. This would be through page 80 in the text. (You may think 50 pages is a lot of reading, but in this case… it’s not.)
I would like you to maintain a notebook for this class; this can be loose-leaf, but make sure you have a single, coherent place for notes for your study of electricity and electronics. I will, on occasion, check these notebooks for particular things. Sometimes, it will be that you made notes; sometimes, that you came up with questions. It will vary… but, making notes about things you think are important, and writing questions about things you are confused about are both important parts of the learning process when you are reading a new text.
In this case, I would ask you to make notes and focus on a few things:
Chapter One
-
P, V, and I. We’ll want to be able to work with the relationship between power, voltage, and current. You might take a look at one or two electrical devices and come in prepared to discuss them based on their voltage and current ratings.
-
Voltage/Potential. Make some notes, or come in with questions.
-
I’m not worried about the atomic structure of things and static electricity… at this time. We’ll come back to it. So, read it, make notes as you will, but this isn’t going to be a focus for our conversation at this time.
Chapter Two
-
The idea of switches. Possibly obvious, possibly not.
-
DC vs. AC. We will work with DC a lot in this class.
-
Current and Resistance. Useful relationships; make notes on the analogies and formulas used.
-
Basic Circuits. Ohm’s Law (p. 82) is something we’ll work with all term. Might as well start thinking about it, making notes, and asking questions right now.
-
We won’t focus on series and parallel just yet. But we will soon.
Create Accounts / Download Software
We’re going to use several CAD tools this term; one is called Fritzing. This tool lets us draw circuit diagrams, and then produce them on our PCB mill. (Someone remind me to show you the PCB mill; it’s a good toy.) We will also begin experimenting with Circuits 123D (produced by AutoDesk); this is a piece of software that runs in your web browser. It probably works best with Chrome and Firefox, to be honest.
Circuits 123D
Circuits 123D can be found online at
Create an account for yourself.
Fritzing
Second, download and install Fritzing. This is a free, open source application.
Draw Your First Circuit
We’ll start with Fritzing, and we’ll spend some time with Circuits 123D in class.
There’s a tutorial (as well as links to tutorial videos) on the Fritzing website:
http://fritzing.org/building-circuit/
Using this tutorial (or, by just experimenting), see if you can draw out the circuit that we built in class the first day. The components you’ll need will include:
- An LED
- Wires
- A resistor (1K)
- A 9V battery
In this case, use the 9V battery instead of a power supply. Or, go looking around in Fritzing… does it have a power supply anywhere?
When you draw your circuit, see if you can do it neatly. Can you add additional bendpoints to the lines so that you have nice, neat 90˚ turns everywhere? Can you make it so the lines are nicely curved and swoopy? Can you make sure you don’t cross things over more than necessary?
HINT: This page from the Bald Engineer has two great resources. I’ll discuss each of those resources below, but you may want to read more on his webpage.
Messy Fritzing Diagrams
The Bald Engineer talks about making nice Fritzing diagrams. He has this great picture
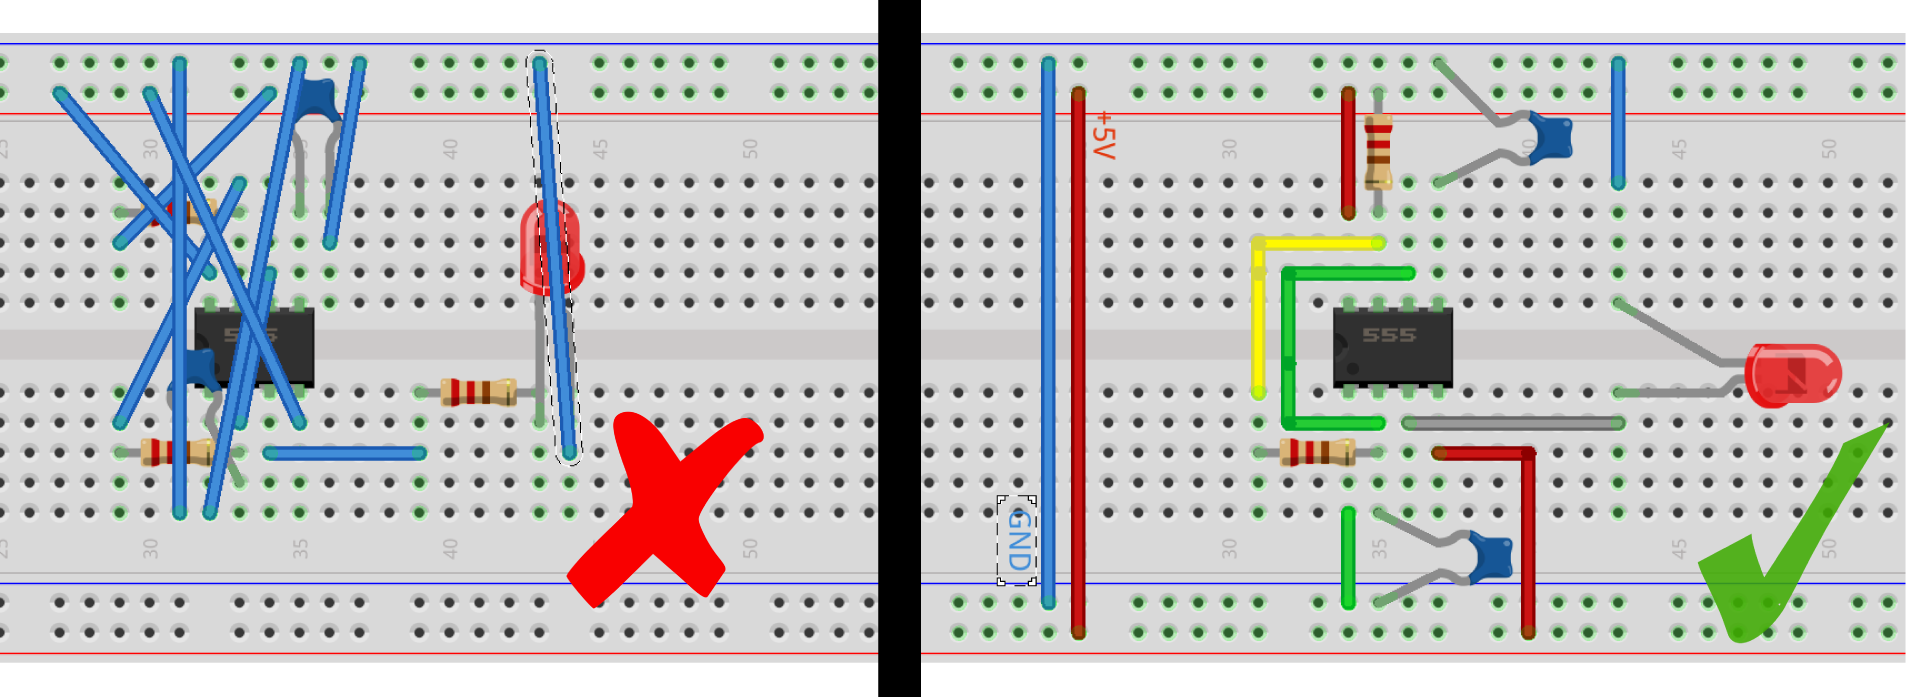
On the left is a messy Fritzing diagram. On the right is the same circuit, made neat. MAKE NEAT DIAGRAMS. And, read his page (section #6) to learn more.
Current-Limiting Resistors
The Bald Engineer also talks about current-limiting resistors. It’s a nice video, and I think you should watch it.
If there are things you don’t understand, you should write down some questions in your notebook, and come in prepared to ask them in class.
Learning Outcomes
Fritzing is a powerful CAD package, despite it’s apparent ease-of-use. And, it is very popular as a tool for drawing, sharing, and talking about small circuits online. Starting to use Fritzing to draw circuits leads us down the path of using tools that are common to a global community of makers, technologists, and engineers. The LANGUAGE of electronics (or, circuits) is almost always communicated between makers visually and electronically.